AniFuzion AniFuzion
  • Why AniFuzion
    • Popular Usages
      • Business Introduction Videos
      • Explainer Videos
      • Marketing Videos
      • Storytelling Videos
      • YouTube Videos
      • Cartoon Video
      • Commercial Video
      • Digital Marketing Videos
      • Corporate Video
      • Promo Videos
      • Consulting Companies
    • Solutions by Business
      • Educational Institutions
      • Enterprise
      • Entrepreneurs
      • Governments
      • Marketing Agencies
      • Small Businesses
      • Restaurant Owners
      • Arts and Crafts Sellers
      • App Developers
      • Filmmakers & Video Producers
    • Solutions by Business
      • Coaches and Consultants
      • Personal Brands
      • SaaS Companies
      • Social Media Marketers
      • Consumer Brands
      • Event Organizers
      • Digital Marketing Teams
      • Content Creators
      • Travel and Hospitality
      • Real Estate Agencies
      • Nonprofits
  • Features
  • Character Families
  • Templates
  • Video Gallery
  • Tutorials
  • Blog

Scene and Environment

  • Introducing Clay Background Style
  • Filter Elements on Timeline
  • Zoom and Pan
  • Add Scene Transition to Animation
  • Preview Video with the All Scenes View
  • Set Background Music For Your Video
  • Extend the Duration of a Scene
  • Edit Scene Background
  • Create and Manage Your Scene

Character

  • Pirate Kit: Unleash High-Seas Adventures in Your Animations
  • Changing the clothes for your 3D character
  • Character Swap
  • DreamSquad: A Versatile Character Family for All Your Animation Needs
  • Adjust the Brightness of Characters to Match the Scene
  • Add Character to Your Video

Action Basic

  • Keep and Reuse Actions with the Action Library
  • Split an Action into Two Parts
  • Repeat an Action or a Pose
  • Rotate a Character
  • Seamless Action Transition with Blending
  • Merge Two Actions
  • Adjust the Speed of Character Action
  • Trim An Action On The Timeline

Action Customization

  • Adjust Feet to Match Background Perspective
  • Adjust Head Orientation for Natural Interaction
  • Flip Action for Seamless Prop Continuity
  • Make Your Action Repeatable
  • Pose Correction with Pose Offset
  • Pose Correction by Setting Arm Spacing

Props and Assets

  • Make the Hand Hold an Object
  • Move a Graphic by Setting Motion Path
  • Add Animated Assets to Diagram
  • Set Enter / Exit Animation Effect on a 3D Prop
  • Rotate a 3D Prop
  • Set Enter / Exit Animation Effect to Graphic and Text

Callouts, Speech and TTS

  • Add Narration to Your Animation
  • Make A Character Talks

Layer

  • Move an Object Above/Below Another Object

Publishing

  • Export the Animation as Animated Flipbooks
  • Share Your Work as Bundle File
  • Export Video as MP4

Case Study

  • Creating a Presentation Video with Motion Mixer
  • Creating a Dance Competition Scene with Motion Mixer

Tips & Techniques

  • How to Create a Clear Story Flow with Image Transitions and Action Changes
  • Present Bullet Points Creatively Through Engaging Animations
  • How to Make Your Character Appear and Disappear Mysteriously in the Scene
  • Seamlessly Integrate Your Character into the Scene
  • Create a Smooth Video with Harmonious Colors and Natural Movements
View Categories
  • Home
  • Tutorials
  • Scene and Environment
  • Preview Video with the All Scenes View

Preview Video with the All Scenes View

Visual Paradigm Online offers the flexibility to create animations across multiple scenes, and the “All Scene View” is an essential feature for efficiently previewing and managing these scenes. This view allows you to see how all scenes come together in the timeline, providing a comprehensive overview of your animation. In this tutorial, we’ll explore how to use this feature to enhance your editing and previewing process.

Managing Scenes in the Editor #

In VP Online, scene management is streamlined for ease of use. By pressing the Scenes button, you can access all your scenes in the palette on the right side. This palette allows you to create new scenes, insert, duplicate, and reorder existing ones. While you can preview each scene individually, the “All Scene View” offers a more holistic perspective. It displays all scenes on the timeline, making it easier to see how they connect and transition from one to another.

Learn More: Create and Manage Your Scenes

Using the All Scene View #

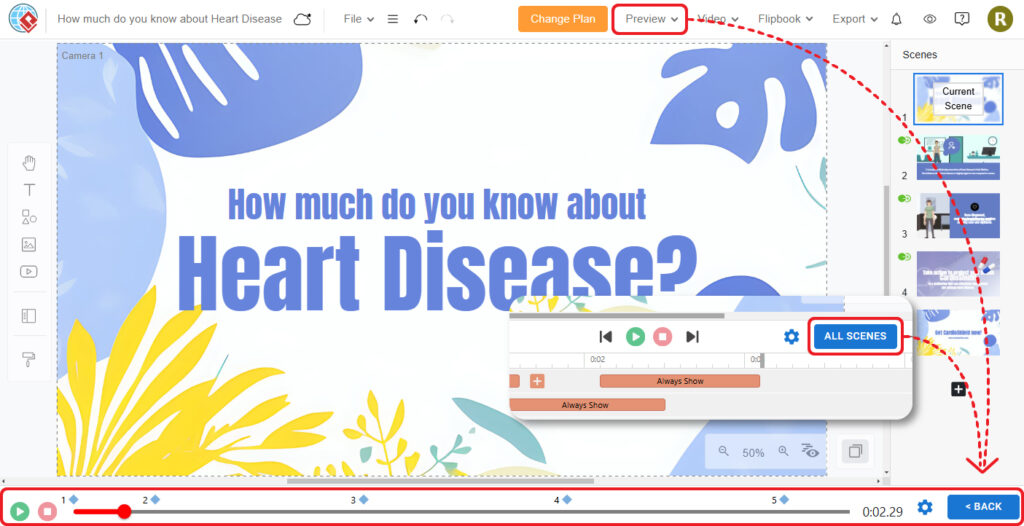
By pressing the All Scenes button, you can view all scenes linked together on the timeline. This allows you to preview across scenes seamlessly by moving the playhead along the timeline, including the transitions between scenes. You can also select the transition parts to access the transition effect library, enabling you to quickly preview and choose the effects that best suit your needs.

How to open the all scenes view:

  • (a) Press the All Scenes button on the top right of the timeline
  • (b) Press Preview > From First Scene/ From Current Scene on the top right of the editor

About the all scenes view:

  1. The bar includes all scenes, it is split to multiple parts in different length, representing the duration of each scenes respectively
  2. Dots on the bar represent the starting point of different pages
  3. Hovering the mouse on the dot, the transition effect button will be shown on top
  4. Press the play button to preview the whole video (including the scene transition effect)

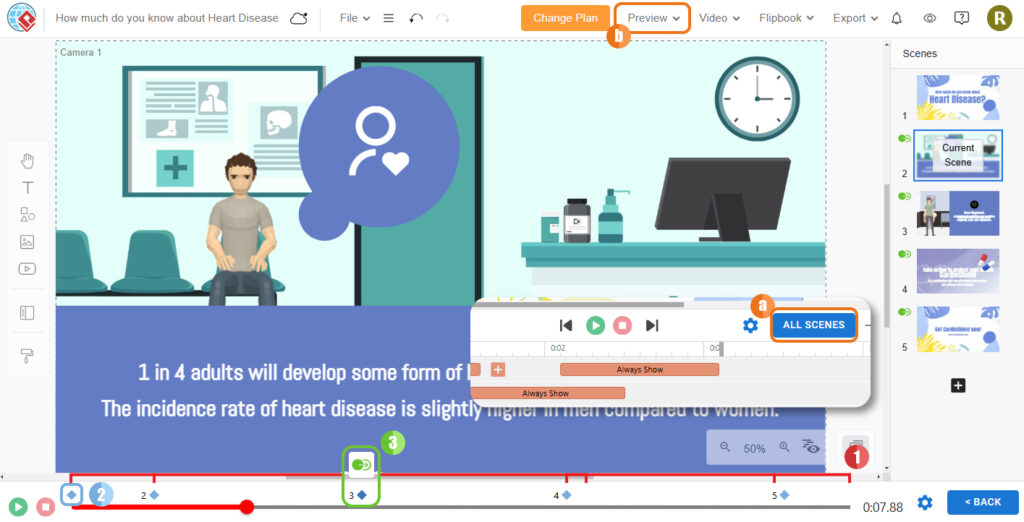
If you need to edit a specific scene, simply select the Back button, or click anywhere of the scene, to return to the general mode and continue your editing.

Why Using the All Scene View #

  • Seamless Transition Preview: It allows you to quickly see how transitions between scenes are working in real-time, helping you to fine-tune and ensure smooth flow throughout your animation.
  • Better Continuity: By viewing all scenes in order, you gain a clearer understanding of the overall narrative and flow, which helps in maintaining consistency and coherence across the entire animation.
  • Enhanced Editing Efficiency: This view provides a comprehensive overview of the entire project, making it easier to identify and address any inconsistencies or areas that need adjustment.
  • Quick Access to Transition Effects: Selecting transition parts in this view brings up the transition effect library, allowing for rapid adjustments and application of effects without interrupting your workflow.
  • Streamlined Workflow: The ability to preview and edit scenes collectively helps in managing large projects more effectively, saving time and improving productivity.

By utilizing the All Scene View, you can ensure a more cohesive and polished final animation, enhancing both the efficiency and quality of your creative process.

Share This Article :
  • Facebook
  • X
  • LinkedIn
  • Pinterest
Add Scene Transition to AnimationSet Background Music For Your Video
Table of Contents
  • Managing Scenes in the Editor
  • Using the All Scene View
  • Why Using the All Scene View

Copyright © 2025 Anifuzion.com

Company

About Us

Help?

FAQ

Privacy

Term & conditions

Reporting

Follow Us

Youtube Facebook X-twitter Instagram Linkedin