AniFuzion AniFuzion
  • Why AniFuzion
    • Popular Usages
      • Business Introduction Videos
      • Explainer Videos
      • Marketing Videos
      • Storytelling Videos
      • YouTube Videos
      • Cartoon Video
      • Commercial Video
      • Digital Marketing Videos
      • Corporate Video
      • Promo Videos
      • Consulting Companies
    • Solutions by Business
      • Educational Institutions
      • Enterprise
      • Entrepreneurs
      • Governments
      • Marketing Agencies
      • Small Businesses
      • Restaurant Owners
      • Arts and Crafts Sellers
      • App Developers
      • Filmmakers & Video Producers
    • Solutions by Business
      • Coaches and Consultants
      • Personal Brands
      • SaaS Companies
      • Social Media Marketers
      • Consumer Brands
      • Event Organizers
      • Digital Marketing Teams
      • Content Creators
      • Travel and Hospitality
      • Real Estate Agencies
      • Nonprofits
  • Features
  • Character Families
  • Templates
  • Video Gallery
  • Tutorials
  • Blog

Scene and Environment

  • Introducing Clay Background Style
  • Filter Elements on Timeline
  • Zoom and Pan
  • Add Scene Transition to Animation
  • Preview Video with the All Scenes View
  • Set Background Music For Your Video
  • Extend the Duration of a Scene
  • Edit Scene Background
  • Create and Manage Your Scene

Character

  • Pirate Kit: Unleash High-Seas Adventures in Your Animations
  • Changing the clothes for your 3D character
  • Character Swap
  • DreamSquad: A Versatile Character Family for All Your Animation Needs
  • Adjust the Brightness of Characters to Match the Scene
  • Add Character to Your Video

Action Basic

  • Keep and Reuse Actions with the Action Library
  • Split an Action into Two Parts
  • Repeat an Action or a Pose
  • Rotate a Character
  • Seamless Action Transition with Blending
  • Merge Two Actions
  • Adjust the Speed of Character Action
  • Trim An Action On The Timeline

Action Customization

  • Adjust Feet to Match Background Perspective
  • Adjust Head Orientation for Natural Interaction
  • Flip Action for Seamless Prop Continuity
  • Make Your Action Repeatable
  • Pose Correction with Pose Offset
  • Pose Correction by Setting Arm Spacing

Props and Assets

  • Make the Hand Hold an Object
  • Move a Graphic by Setting Motion Path
  • Add Animated Assets to Diagram
  • Set Enter / Exit Animation Effect on a 3D Prop
  • Rotate a 3D Prop
  • Set Enter / Exit Animation Effect to Graphic and Text

Callouts, Speech and TTS

  • Add Narration to Your Animation
  • Make A Character Talks

Layer

  • Move an Object Above/Below Another Object

Publishing

  • Export the Animation as Animated Flipbooks
  • Share Your Work as Bundle File
  • Export Video as MP4

Case Study

  • Creating a Presentation Video with Motion Mixer
  • Creating a Dance Competition Scene with Motion Mixer

Tips & Techniques

  • How to Create a Clear Story Flow with Image Transitions and Action Changes
  • Present Bullet Points Creatively Through Engaging Animations
  • How to Make Your Character Appear and Disappear Mysteriously in the Scene
  • Seamlessly Integrate Your Character into the Scene
  • Create a Smooth Video with Harmonious Colors and Natural Movements
View Categories
  • Home
  • Tutorials
  • Scene and Environment
  • Zoom and Pan

Zoom and Pan

Visual Paradigm Online is a professional tool designed to help you create stunning animations with ease. Among its many features, camera settings play a crucial role in determining how your animations are perceived by your audience. In this tutorial, we’ll focus on how to effectively use the Zoom and Pan features to enhance your animations.

Illustration showing that we camera zoom and pan are useful skills.

The Importance of Camera Settings in Video Making #

Camera angles and movements are essential elements in video production, as they guide the viewer’s attention and set the tone for the narrative. Proper use of camera zoom and pan can create dynamic effects, emphasize key moments, and add depth to your scenes. Whether you’re highlighting a character’s expression, drawing focus to a particular element, or transitioning between scenes, camera control is vital. VP Online not only allows you to set up these camera effects but also provides the flexibility to customize characters and elements, ensuring that every shot looks just the way you want.

Using the Camera in VP Online #

Part 1: Basic Camera Setup #

In the editor, a default camera is always present, showing the full scene. If you want to zoom in on a specific detail or pan across your scene, you’ll need to add additional cameras. This can be done by clicking the “Add Camera” button.

  • Zoom: Resize the camera to zoom in or out, focusing on specific parts of the scene.
  • Pan: Move the camera horizontally or vertically across the scene to follow the action or reveal new elements.

camera bar in the timeline for customization

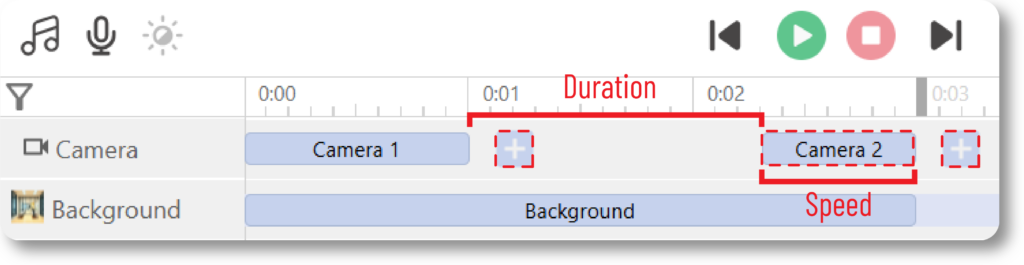
The camera bar, which appears on the timeline, represents the duration of the camera’s movement or transition. You can edit this bar to control the speed of the zoom or pan, allowing for smooth or quick transitions as needed.

  1. On the Camera bar, by default, there is a “Camera 1”
  2. To add changes, press the Add button
  3. A new camera will appear on the scene, edit it to fit our need
    • Zoom In/ Out: Change the size of the latter camera, make it smaller to zoom in and make it bigger to zoom out
    • Pan: Keep the camera size be the same, and move the position of the latter camera to make it pans
  4. Move the camera bar to control the duration (space between two camera bars)
  5. Change the length of the latter camera bar to control the speed of the camera change

Changing the length and position of the camera bars allow us to control the zoom and pan.

Part 2: Previewing and Editing Camera Movements #

Once you’ve set up your cameras, it’s important to preview the animation to see how the camera movements affect the overall scene. The preview button in VP Online allows you to watch your animation in real-time, but the quickest way to check specific moments while editing is by dragging the playhead along the timeline.

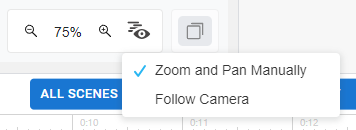
If you’ve added new cameras but don’t notice a change when moving the playhead, you may need to adjust the editor view:

  • Zoom and Pan Manually: This option allows you to freely zoom and pan the editor view without being constrained by the camera settings, giving you more control over scene composition during editing.
  • Follow Camera: When selected, the editor view will automatically follow your camera settings, showing you exactly how the final animation will look with the camera movements.

We can choose to switch to follow camera or zoom and pan manually in the editor.

If you want an accurate preview of your animation and need to make precise adjustments, “Follow Camera” is the best option. However, if you’re working on the overall scene composition or making adjustments to camera movements, switching back to “Zoom and Pan Manually” will prevent the camera settings from obstructing your work.

Exploring Camera Templates in VP Online #

Here, we will introduce some of the templates in VP Online that incorporate camera zoom or pan effects. These templates are a great starting point for creating dynamic animations, allowing you to see how different camera techniques can be applied effectively. Whether you’re new to using camera controls or looking for inspiration, these templates can help you visualize the impact of zoom and pan on your projects

https://online.visual-paradigm.com/images/animated-explainer/templates/video/Stressful%20Employee%20Response%20Video%20Template.mp4

Stressful Employee Response Video Template

https://online.visual-paradigm.com/images/animated-explainer/templates/video/Self%20Introduction%20of%20Alan.mp4

Explainer Video Template: Self Introduction of Alan

Share This Article :
  • Facebook
  • X
  • LinkedIn
  • Pinterest
Filter Elements on TimelineAdd Scene Transition to Animation
Table of Contents
  • The Importance of Camera Settings in Video Making
  • Using the Camera in VP Online
    • Part 1: Basic Camera Setup
    • Part 2: Previewing and Editing Camera Movements
    • Exploring Camera Templates in VP Online

Copyright © 2025 Anifuzion.com

Company

About Us

Help?

FAQ

Privacy

Term & conditions

Reporting

Follow Us

Youtube Facebook X-twitter Instagram Linkedin